The SuperMap iServer Web printing service makes use of the layput template to output printable map documents. iServer supports loading layout templates made by SuperMap iDesktop/iDesktopX and Jaspersoft Studio. Where SuperMap layput templates generated by iDesktop/iDesktopX can be exported to ult files for distribution; templates generated by third-party software Jaspersoft Studio can be exported to distribute the jrxml file. The download address is https://community.jaspersoft.com/project/jaspersoft-studio .
Built into the iServer product package are layout templates made by SuperMap iDesktop/iDesktopX and Jaspersoft Studio, located in 【iServer root directory】/webapps/iserver/templates/web printing-layouts directory, each layput template is stored in a folder named Layout template.
For the layput template made by SuperMap iDesktop/iDesktopX software, a template file named UGCLayoutTemplate is built into SuperMap iServer, and the folder of the same name contains the following contents:
For the layout template produced by Jaspersoft Studio, taking A4_landscape (A4 horizontal plate) as an example, the folder with the same name contains the following files:
In addition, several *.json request body examples are provided in the layput template folder, which can be referenced by the input request body when creating a print job.
You can also use the Get Request for Layout Templates Resource or direct access to iSrever layout list resource page (iserver/services/web printing/rest/v1/webprinting/layouts) looks at the information for all built-in layput templates. When creating a print job , the templateName parameter in the layoutOptions object in the request body specifies the name of the built-in layout template folder.
If the built-in layput template of iServer cannot meet your use requirements, you can change the layout element content by passing parameters, or customize the layout template according to your use requirements.
When creating a print task , you can update the layout element content in the request body by passing parameters, mainly in the request body modify the parameters in the layoutOptions object, as Described in Print Task List Resources POST Request . The following layout element contents can be modified:
If changing the layout element content through the above method still cannot meet your requirements, you can also customize the layout template, such as adjusting the position of the layout element, deleting or adding the layout element, etc.
You can directly modify the layput template generated by iServer's built-in SuperMap iDesktop/iDesktopX, or generate a new layput template, the print elements in the iServer's built-in template correspond to the map, map scale, north arrow, legend and text in the layout function of SuperMap iDesktop/iDesktopX software. Please refer to SuperMap iDesktop/iDesktopX Help for operational modifications.
If you choose to generate a new layput template, create a new folder under the iServer package Web print layout folder with the same name as the layput template file, and export the layput template (*.ult) to that folder. That is, 【iServer root directory】/webapps/iserver/templates/webprinting-layouts/【layput template filename】. After the above steps are completed, the iServer changes to the template are automatically detected and loaded for the new template to take effect.
Please note:
1. For map title, subtitle, author information, copyright information and other text content, in SuperMap iDesktop/iDesktopX is defined by text. When defining, text content needs to start with "$" and correspond to the parameters in the layout information (layoutOptions), such as "$title". If you need to specify a default value, it can be defined as "$title: World Map". When you need to input multiple lines of text, you can predefine the text box in the template and input the text content. When you input the text, you can type the new line as needed and set the alignment for the text. If you do not set it, the default is center alignment; You can also enter multiple lines of text in the request body by passing parameters, but you need to predefine a text box that can cover the range of text elements. See layoutOptions for details of parameter writing in the request body.
2. For the text scale defined in SuperMap iDesktop/iDesktopX, such as "1:1000000", you need to set the scaleBarVisible parameter settings in the layout information (layoutOptions) as False, and set the scaleText parameter settings to the corresponding string value, such as 1:1000000, to take effect during printing.
3. When you need to add an image to the map, such as the specified logo image, you need to use SuperMap iDesktop/iDesktopX add a rectangular face object to the template and imports the specified logo image into it.
4. When you create a layput template for Printing a National Standard Map Sheet Map , it is recommended that the template contain only the map element (the legend element is optional). Because there are related settings of map title, scale, compass and other elements in the standard marking options, and the map printing results can be generated more professionally according to the national standards in the standard marking mode. Therefore, if there are other layout elements in the layput template, it may cause problems such as duplicate printing elements and poor printing results.
You can directly modify the built-in Jaspersoft Studio layput template of iServer. After modification, the iServer changes to the template are automatically detected and loaded for the new template to take effect. Taking A4_landscape as an example, the following three files need to be modified:
The specific operation steps are as follows:
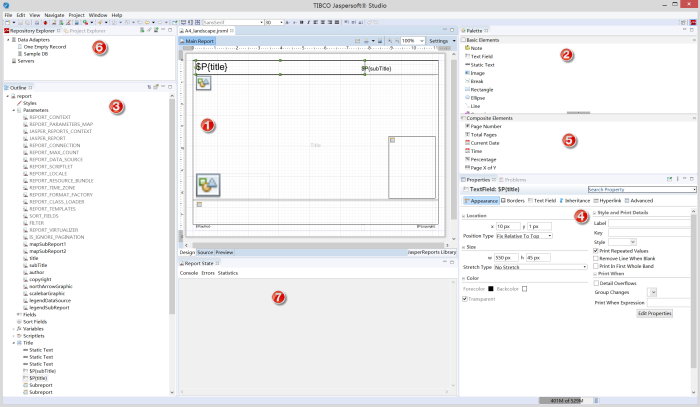
First, briefly introduce the main parts of Jaspersoft Studio software, as shown in the following figure:
As shown in form 2 above, the elements in the iServer built-in layput template correspond to the three elements in the Jaspersoft Studio software: Text Field (text), Image (picture), Subreport (subreport, used for Add Map, little map, legend elements), the following describes how to add or delete respectively.
Text Field (Text)
The map main title, subtitle, author information, and copyright information in the iServer built-in layput template all belong to the Text Field, and the adding method is the same. The specific steps are as follows:
<parameter name="title" class="java.lang.String"/>
<textField>
......
<textFieldExpression><![CDATA[$P{subTitle}]]></textFieldExpression>
</textField>
Through the above three steps, a text element is added, you can also adjust the size of the text box, font, font size and so on.
Image
The compass and scale bar in the iServer built-in layput template belong to Image, and the adding method is the same. The specific steps are as follows:
<parameter name="northArrowGraphic" class="java.lang.String"/>
<image>
......
<imageExpression><![CDATA[net.sf.jasperreports.renderers.BatikRenderer.getInstance(new java.io.File(new java.net.URI($P{northArrowGraphic})))]]></imageExpression>
</image>
Through the above three steps, a picture element is added, and you can also adjust the size, position and so on of the picture box.
Subreport
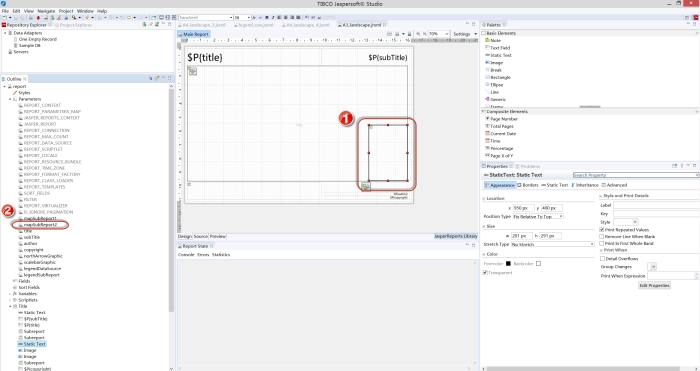
Maps, little maps, and legends in the iServer built-in layput template need to be added through Subreport in the same way. The specific steps are as follows:
<parameter name="mapSubReport1" class="java.lang.String"/>
<subreport>
......
<subreportExpression><![CDATA[$P{mapSubReport1}]]></subreportExpression>
</subreport>
Through the above three steps, a sub-report element is added. You can also adjust the size, position and so on of the sub-report.
If you want to delete the elements added above, you need to delete the elements in area 1, and delete the corresponding parameters in area 3.
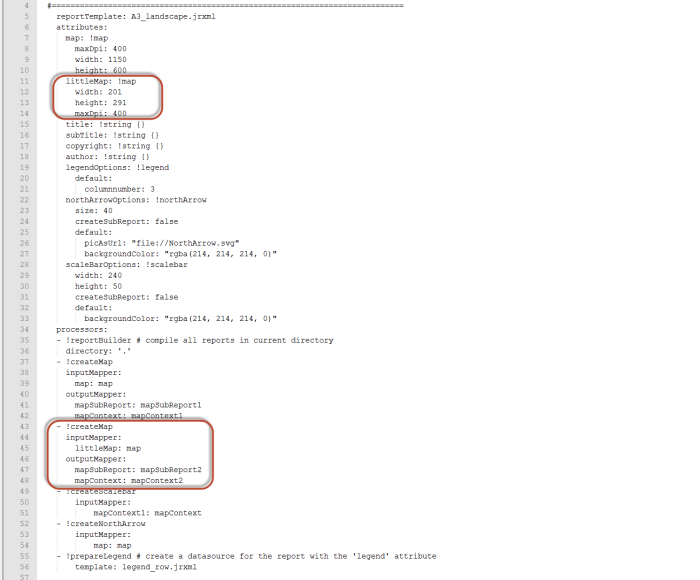
For the layput template customized through Jaspersoft Studio software, if a certain layout element is added or deleted, you also need to add or delete relevant content in the config.yaml file. The following are the config. Yaml file contents and notes for the A4_land scape (A4 cross plate):
templates:
#===========================================================================
A4 landscape: !template
#===========================================================================
reportTemplate: A4_landscape.jrxml //Layout template name
attributes: //Attribute information
map: !map //Map
maxDpi: 400 //Maximum dpi of the map
width: 800 //Width of map frame
height: 410 //Height of map frame
littleMap: !map //Little map
width: 150 //Width of little map frame
height: 200 //Height of little map frame
maxDpi: 400 //Maximum dpi of the little map
title: !string {} //The main title of the map
subTitle: !string {} //The subtitle of the map
copyright: !string {} //Copyright information for the map
author: !string {} //Map author information
legendOptions: !legend //legend
default:
columnnumber: 3 //The number of columns of the legend element. The default is 3 columns
northArrowOptions: !northArrow //The north arrow
size: 40 //The frame of the north arrow
createSubReport: false
default:
picAsUrl: "file://NorthArrow.svg" //The picture of the north arrow
backgroundColor: "rgba(214, 214, 214, 0)" //The frame background color of the north arrow, default transparency
scaleBarOptions: !scalebar //Scale bar
width: 240 //The width of the scale bar
height: 50 //The height of the scale bar
createSubReport: false
default:
backgroundColor: "rgba(214, 214, 214, 0)" //Background color of the scale bar, default transparency
font: "boldface" //The font of the scale text
fontSize: 12 //Font size of scale bar text
fontColor: "black" //The font color of scale bar text
scaleBarVisible: true //Whether to display scale bar. Default value: true, displays scale bar
align: "center" //The position of the scale
processors: //Processors
- !reportBuilder # compile all reports in current directory
directory: '.'
- !createMap //New map
inputMapper: //Map input
map: map //Types of maps
outputMapper: //Map output
mapSubReport: mapSubReport1 //Map subreport name in Jaspersoft Studio software
mapContext: mapContext1
- !createMap //New little map
inputMapper: //Little map input
littleMap: map //Types of little maps
outputMapper: //Little map output
mapSubReport: mapSubReport2 //Little map subreport name of Jaspersoft Studio software
mapContext: mapContext2
- !createScalebar //Create a new scale
inputMapper: //Scale input
mapContext1: mapContext //Scale specified map
- !createNorthArrow //New north arrow
inputMapper: //North arrow input
northArrowDef: northArrow //The type of the north arrow
map: map //The map designated by the north arrow
- !prepareLegend # create a datasource for the report with the 'legend' attribute
template: legend.jrxml //Associated legend template name
If you add or delete a layout element in the layput template customized by Jaspersoft Studio software, you need to add or delete the corresponding element contents in the attributes and processors of the config.yaml file.

After completing the above modifications in steps 1, 2, and 3, restart the iServer, and then send the request body without the little map in step 4 to the iServer Web print service, and the output map document will have no little map.
In view of some actual project requirements, By default, iServer provides an A3 horizontal layput template with four corner marks (located in 【iServer root directory】/webapps/iserver/templates/webprinting-layouts/A3_mapcornermarks folder). You can use this template directly when creating a print task. The effect is shown in the following figure.

Of course, you can also manually add the four corner tags in the existing default layput template in the following way. It should be noted that the function of adding four corner markers does not support the layput template with a little map. If there is a little map in the layput template you use, you need to refer to example 1 above to remove the little map.
| textFieldExpression | The actual meaning of corner mark |
| ($P{mapCornerMarks}.split(","))[0] | Degree of longitude on the upper left |
| ($P{mapCornerMarks}.split(","))[1] | Minutes of longitude on the upper left |
| ($P{mapCornerMarks}.split(","))[2] | Seconds of longitude on the upper left |
| ($P{mapCornerMarks}.split(","))[3] | Degree of longitude on the upper left |
| ($P{mapCornerMarks}.split(","))[4] | Minutes of longitude on the upper left |
| ($P{mapCornerMarks}.split(","))[5] | Seconds of longitude on the upper left |
| ($P{mapCornerMarks}.split(","))[6] | Degree of longitude on the upper left |
| ($P{mapCornerMarks}.split(","))[7] | Minutes of longitude on the upper left |
| ($P{mapCornerMarks}.split(","))[8] | Seconds of longitude on the upper left |
| ($P{mapCornerMarks}.split(","))[9] | Degree of longitude on the upper left |
| ($P{mapCornerMarks}.split(","))[10] | Minutes of longitude on the upper left |
| ($P{mapCornerMarks}.split(","))[11] | Seconds of longitude on the upper left |
| ($P{mapCornerMarks}.split(","))[12] | Degree of longitude on the upper left |
| ($P{mapCornerMarks}.split(","))[13] | Minutes of longitude on the upper left |
| ($P{mapCornerMarks}.split(","))[14] | Seconds of longitude on the upper left |
| ($P{mapCornerMarks}.split(","))[15] | Degree of longitude on the upper left |
| ($P{mapCornerMarks}.split(","))[16] | Minutes of longitude on the upper left |
| ($P{mapCornerMarks}.split(","))[17] | Seconds of longitude on the upper left |
| ($P{mapCornerMarks}.split(","))[18] | Degree of longitude on the upper left |
| ($P{mapCornerMarks}.split(","))[19] | Minutes of longitude on the upper left |
| ($P{mapCornerMarks}.split(","))[20] | Seconds of longitude on the upper left |
| ($P{mapCornerMarks}.split(","))[21] | Degree of longitude on the upper left |
| ($P{mapCornerMarks}.split(","))[22] | Minutes of longitude on the upper left |
| ($P{mapCornerMarks}.split(","))[23] | Seconds of longitude on the upper left |
......
author: !string {}
mapCornerMarks: !string
default: ""
legendOptions: !legend
......