Online low-code editing |
Starting from SuperMap iPortal 11i(2023), the MapDashboard provides a built-in low-code editor for developers with front-end development foundations such as JavaScript.
You can easily customize your dashboard application by writing a few code, which effectively improves the efficiency of development and customization.
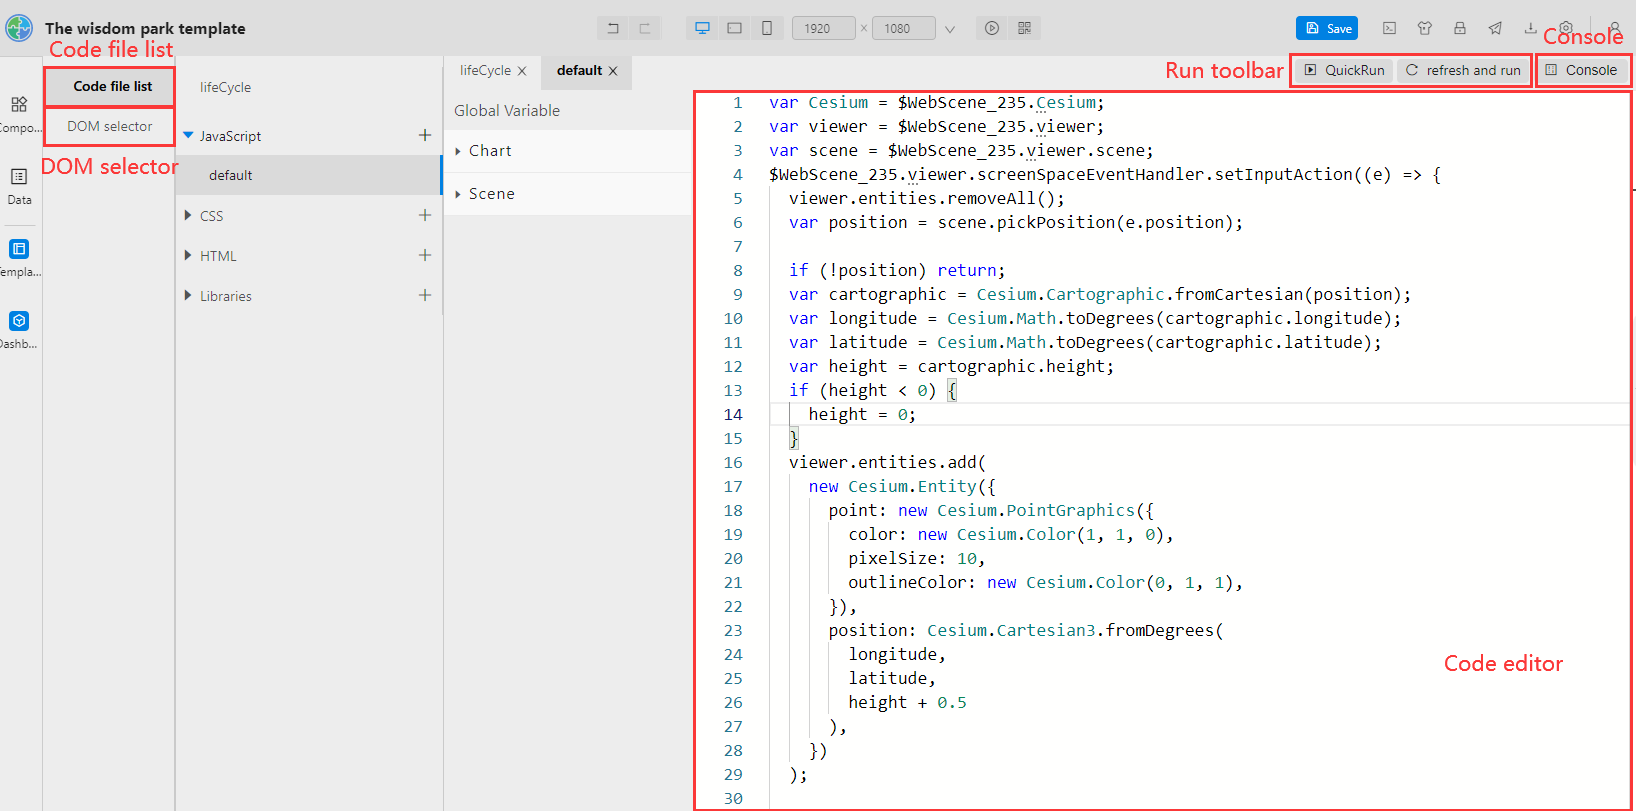
After entering the MapDashboard WebApp, click the ![]() icon in the upper right corner to open the low-code editor. The low-code editor layout and instruction for use are as follows:
icon in the upper right corner to open the low-code editor. The low-code editor layout and instruction for use are as follows:

The Low-code editor consists of Code file list, DOM selector, Code editor, Run toolbar and Console.
Code file list includes lifeCycle, file lists of JavaScript, CSS, HTML and third-party libraries and it provides a build-in Global Variable menu in JavaScript file.
Table 1 Description of application life cycle
|
Function name |
Description |
|
beforeAppload |
Execute before the application loads |
|
appLoaded |
Execute after the application is loaded |
|
beforeComponentLoad |
Execute before the specified component is loaded |
|
componentLoaded |
Execute after the specified component is loaded |
|
beforeActionUpdate |
Execute before the interaction updates |
|
actionUpdated |
Execute after the interaction updates |
It can display the HTML hierarchy structure of all components in the current dashboard application. The page elements support linkage with the corresponding code blocks. The selected page elements/code block will be highlighted, which is convenient to quickly locate and style editing.
Visual preview and online editing of selected files, providing intelligent tips for global variable methods and properties, lowering the code error rate and reducing the workload of code writing.
After the code is written, click QuickRun button or Refresh and Run button, the interface will display the actual running effect, and the log and other information will be output on the console for your debugging.
Output the log, warnings, errors and other information generated during the running of the code, to quickly locate and resolve problems.
You can write code in default code file under the JavaScript, CSS, and HTML file lists, or click ![]() next to the corresponding file list to add a new code file. The default name of new code file is "code", click
next to the corresponding file list to add a new code file. The default name of new code file is "code", click ![]() next to it to modify it.
next to it to modify it.
Firstly, open the target JavaScript code file, and the components that support global variables in the current dashboard application will be displayed in the Global Variables menu, Hovering over the name of a component, the corresponding component on the current dashboard application will be highlighted. Then click next to the component, you can get variable name of the component, or select target event to add the event code with one click in the file you just opened.
Events supported by components are shown in the following table:
Table 2 Events supported by components
|
Components |
Events |
|
Map |
Map Event, Mouse Event, Lifecycle Event, DataLoading Event |
|
Scene |
Mouse Event, Keyboard Event, Entity Event, ImageryLayer Event, DataSource Event, Scene Event, Camera Event、Clock Event, InfoBox Event, Image Event |
|
Histogram, Bar, Pie, Scatter, Line, Radar |
Mouse Event, Legend Event, Other Event |
|
Gauge, Liquid Fill |
Mouse Event, Other Event |
|
VideoPlus |
Mouse Event, Video Event |
|
Slideshow |
Mouse Event, Switch Event, Sliding Event, Lifecycle Event, Other Event |
Click "Capture Node" in DOM selector, then select the page element you want to modify styles in the current dashboard application. The selected page element and its corresponding node position in DOM selector will be highlighted. Similarly, select a node in DOM selector, the corresponding page element will be highlighted.
It supports customize page element styles in DOM selector. Select the node you want to modify in DOM selector and click "Modify Node Style" in the right-click menu. Then the corresponding CSS file will be displayed in Code editor. You can modify the styles of size, location, text of page elements in CSS files.
Click ![]() next to Library in Code file list, input the address of third-party library in the pop-up text box. Then, click the blank position outside the text box to complete the introduction of third-party library.
next to Library in Code file list, input the address of third-party library in the pop-up text box. Then, click the blank position outside the text box to complete the introduction of third-party library.