Shared directory configuration |
iPortal and iServer shared directory configuration, when iPortal and iServer are installed on windows and linux respectively, it is recommended that the shared directory be configured on the machine where the iServer server is located. The following section describes in detail how to configure the shared directory:
Open File Explorer and locate the folder you want to share. Right-click the folder and select Properties;
In the Properties window, select the Sharing tab and click "Advanced Sharing";
In the "Advanced Sharing" window, check the "Share this folder" option, you can change the share name, you can also retain the default name;
Click "Permissions", select the user or group you want to share with; add accessible windows users and set permissions;
Select "Read/Write" or "Read Only" permission;
Click the "OK" button to save the settings;
In File Explorer, enter \\192.168.15.118 in the address bar of the folder, enter the user name and password set with permission. You can also find your own host name in the network, double click to view the host name, you can view the shared directory information;
Note: 192.168.15.118 is the ip address of the computer.
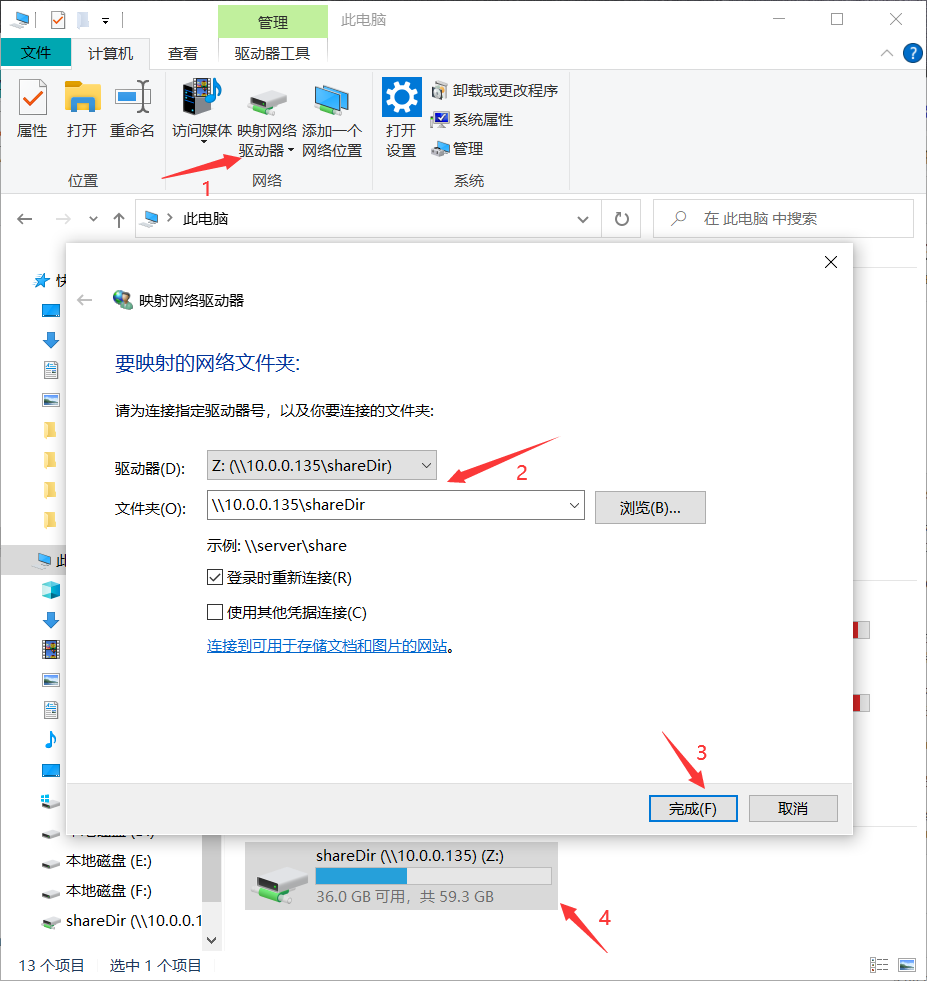
Other windows host to use windows shared directory, open the file explorer, click on this computer, select the top of the mapped network drive, drive select the free disk drive Z:, folder fill in the remote shared directory address;

Click Finish and a new disk drive will appear.
NFS server:
Create NFS shared directory
cd /home/admin/
mkdir nfsdir
vi nfsdir/123.json
Close SELinux
getenforce
vi /etc/selinux/config
SELINUX=permissive
setenforce 0
getenforce
Install NFS
yum install nfs-utils nfs-server rpcbind -y
systemctl start rpcbind
systemctl start nfs-server
Configure the shared directory and allow access to host permissions
vi /etc/exports

Check the /etc/exports file for any syntax errors such as missing commas, brackets or quotes. After you have edited the /etc/exports file, use the command "sudo exportfs -r" to apply your changes:
exportfs -r
systemctl restart nfs-server
exportfs -v
If the output of the exportfs -v command is empty, it means that the NFS server did not export any shared directory, and you need to check whether NFS is installed and configured correctly
rpcinfo -p localhost
Check the ports used by NFS, and release the ports included in the output when the firewall is turned on
NFS client uses:
NFS client needs to install nfs-utils
yum install nfs-utils -y
Mount the NFS shared directory to the local directory:

sudo mount <IP address or host name>:/<shared directory> <local directory>
Among them:
Operate in the local directory after successful mounting
Uninstall the NFS shared directory:
sudo umount <mounted NFS shared directory>
In CentOS, you can use the mount.cifs command to access the Windows shared directory, the specific steps are as follows:
Install cifs-utils
sudo yum install cifs-utils
Create a mount directory and create a directory on CentOS that will serve as a mount point for Windows shared directories. For example, you can use the following commands to create a directory:
sudo mkdir /mnt/windows-share
Upload the Windows shared directory, use the following command to mount the Windows shared directory:
sudo mount -t cifs //10.0.0.135/shareDir /mnt/windows-share -o username=winuser,password=winpass,domain=windomain,nobrl
Among them:
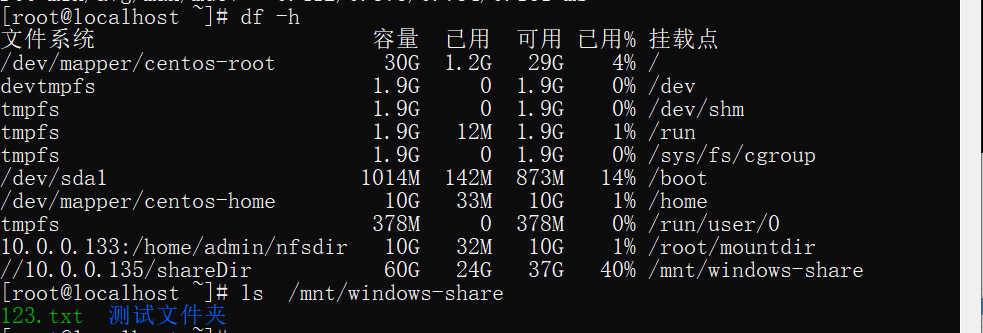
To confirm the mount, use the following command to confirm that the shared directory is mounted:
df -h

To unmount the mounted Windows shared directory, you can use the following command:
sudo umount /mnt/windows-share