Deploying war Package |
After iserver.war of SuperMap iServer has been deployed successfully, The access URI is: http://<server>:<port>/iserver/services. If we the iserver.war is renamed, for example rename it as "renameiserver.war", then the access address is http://<server>:<port>/renameiserver/services.
Before deploying SuperMap iServer on Apache Tomcat, please check the whether the software environment meets the requirement (refer to Environment Configuration for war Package).
Start Apache Tomcat (Tomcat), put the war package into the following directory: [Tomcat root directory] \webapps and Tomcat can publish the war package as Web service. For example, you can start Tomcat and put iserver.war into the webapps directory. Then, the the core functions of SuperMap iServer are enabled. You can access http://<server>:<port>/iserver/services to get the list of all the available services of SuperMap iServer. After publishing the help doc online using Use iserver # help.war, you can access the online help with: http://<server>:<port>/iserver/help . After publishing the iClient online using iserver#iClient.war, you can access the iClient with: http://<server>:<port>/iserver/iClient.
Before deploying SuperMap iServer on Apusic Application Server, please check the whether the software environment meets the requirement (refer to Environment Configuration for war Package).
On Windows, steps for deploying SuperMap iServer to Apusic Application Server (Apusic) are as follows:
Start Apusic, put the war package into the following directory: [Apusic root directory] \domains\[domainname]\applications and Apusic can publish the war package as Web service. [domainname] is the domain name of the running Apusic. For iserver#help.war and iserver#iClient.war, you first need to rename them to make the names include no special symbol "#". For example, change iserver#help to help.war.
After starting Apusic, you can access the management interface through http://<server>:<port>/admin to check the deployment of the war package. You can also deploy the war package through this management interface.
Before deploying SuperMap iServer on GlassFish, please check the whether the software environment meets the requirement (refer to Environment Configuration for war Package).
GlassFish supports automatic deployment, command line deployment and deploying through the management interface. Please refer to GlassFish help for more details about the command line deployment and the deploy mode through management interface. Below introduces the process of automatically deploying SuperMap iServer on GlassFish 3.1.
Start GlassFish, put the war package into the following directory: [GlassFish root directory]\glassfish\domains\[domain-name]\autodeploy and GlassFish can publish the war package as Web service. [domainname]is the domain name of the running GlassFish. For iserver#help.war and iserver#iClient.war, you first need to rename them to make the names include no special symbol "#". For example, change iserver#help to help.war.
After starting GlassFish, you can access the management interface through http://<server>:<port>/common/index.jsf( the default port of GlassFish is 4848) to check the deployment of the war package. You can also deploy the war package through this management interface.
Note:
The running of GlassFish JDK, not JRE. And you need to add %JAVA_HOME%\Bin to PATH.
Before deploying SuperMap iServer on WildFly Application Server, please check the whether the software environment meets the requirement (refer to Environment Configuration for war Package).
On Windows, the process of deploying SuperMap iServer to WildFly 7.x is shown as follows:
1. Extract the war package to[WildFly root directory]\standalone\deployments, and rename it to make the extracted folder ended up with .war. For instance, change the name of the extracted folder of iserver.war to iserver.war. For the iserver#help and iserver#iClient war packages, you still need to rename them the extracted folders make the names include no special symbol "#". For example, change the names to help.war and iClient.war. Create three empty folders under the folder and named: help.war.dodeploy, iClient.war.dodeploy, iserver.war.dodeploy.
2. When publish iserver, modify the [WildFly root directory]\standalone\configuration\standalone.xml file, deleting the following two lines.
<extension module="org.jboss.as.jaxrs"/>
<subsystem xmlns="urn:jboss:domain:jaxrs:1.0"/>
In addition, you also need to add max-post-size="2147483648" in the following tag in the standalone.xml file. The value is in bytes. That is , the maximum file size allowed to be uploaded to iServer is set to 2G. You also can set it according your specific demands. If not set, WildFly default allows files up to 10M in size.
<http-listener name="default" socket-binding="http" redirect-socket="https" enable-http2="true" max-post-size="2097152"/>
3. Extract OnlineHelp.zip in help.war\html to the current directory.
4. Start WildFly, namely, [WildFly root directory]\bin, and run standalone.bat. The SuperMap iServer war package will be published as Web services.
After starting WildFly, you can access management interface (http://<server>:<port>/admin-console) of WildFly to check the deployment of war package. You can also deploy the war package through this management interface.
Note:
1. When deploying services on WildFly, the -b 0.0.0.0 parameter need to be added when starting WildFly in order to visit services on all the computers, otherwise only on the local computer. For example, WildFly can be started through the command in the Windows operation system.
standalone.bat -b 0.0.0.0
The starting method in the Linux operation system is:
./standalone.sh -b 0.0.0.0
2. When deploying the SuperMap iServer service in WildFly, it is recommended that the directory do not contain non-English characters.
3. When deploying SuperMap iServer services in WildFly, users should add the following two dependencies to the path node of [WildFly root directory]\modules\system\layers\base\sun\jdk\main\module.xml file:
<path name="sun/java2d"/>
<path name="sun/java2d/pipe"/>
<path name="com/sun/net/httpserver"/>
<path name="com/sun/org/apache/xml/internal/security/exceptions"/>
Before deploying SuperMap iServer on Oracle WebLogic Application Server, please check the whether the software environment meets the requirement (refer to Environment Configuration for war Package).
On Windows, steps for deploying SuperMap iServer to WebLogic are as follows:
1. Rename iserver#help.war and iserver#iClient.war to make the name include no special symbol "#". For example, respectively rename them as help.war and iClient.war.
2. Start WebLogic and put the war package into the autodeploy directory of the created WebLogic domain. WebLogic can then publish the war package as Web service. If the created WebLogic domain is C:\wls1033_dev\user_projects\domains\SuperMapiServer on Windows, put the war package in C:\wls1033_dev\user_projects\domains\SuperMapiServer\autodeploy.
After starting WebLogic , you can access the management interface through http://<server>:<port>/console to check the deployment of the war package. You can also deploy the war package through this management interface.
If you encounter PermGen space error during deployment, set the PermSize of the current WebLogic domain to 256M. For details, see the FAQ.
Before deploying SuperMap iServer on TongWeb, please check whether the software environment meets the requirement (refer to Environment Configuration for war Package).
On Windows, steps for deploying SuperMap iServer to TongWeb are as follows:
1. Specify the path of SuperMap iObjects Java for TongWeb. Add the SuperMap iObjects Java bin path to Djava.library.path in [TongWeb root]\ bin\startserver.bat, such as Djava.library.path = "C:\ SMO_Java_602_7119_Bin\Bin ".
2. Put the decompression war package into the following directory: [TongWeb root directory]\autodeploy. For iserver # help.war and iserver # iClient.war, you need to rename them so that the name does not contain special symbols "#", such as iserver # help.war to help.war, and then deploy. Start TongWeb, you can see war package has been published as a Web service.
3. In the [TongWeb root directory]\config\twns.xml, find web-app node of help and iClient correspondingly, and then change the context-root of web-app node to iserver/help and iserver/iClient.
4. After starting TongWeb, you can visit TongWeb's management interface to view the deployment of war package. You can also use the management interface for the deployment of war packages. The management console address for TongWeb 5.0 is http://<server>:<port>/twns.
Automatically deploying iserver.war
1. In the [TongWeb root directory] \bin\startserver.bat file, set the following:
set JAVA_OPTS=%JAVA_OPTS% -Dcom.sun.jersey.server.impl.cdi.lookupExtensionInBeanManager=true.
2. Put the decompression war package into the following directory: [TongWeb root directory]\autodeploy. For iserver # help.war and iserver # iClient.war, you need to rename them so that the name does not contain special symbols "#", such as iserver # help.war to help.war, and then deploy. Start TongWeb, you can see war package has been published as a Web service.
3 After starting TongWeb, you can visit TongWeb's management interface to view the deployment of war package.
Using management interface to deploy iserver.war
1. In the [TongWeb root directory] \bin\startserver.bat file, set the following:
set JAVA_OPTS=%JAVA_OPTS% -Dcom.sun.jersey.server.impl.cdi.lookupExtensionInBeanManager=true
2. In the browser, enter the TongWeb Administration Console address: http://<server>:<port>/console
3. Enter the user name and password for logging in to TongWeb. For TongWeb6.0, the default user name is twnt, and password is twnt123.com
4. Click "Application Management", then "Deploy Application"
5. "File location" need to select "server", select where the server.war located in, click "start deployment"
6. Fill in the additional information for application deployment in order, and you can also use default values. Click "Finish"
7. After the deployment is complete, you can view information throught "Application Management" page. And an "activated" state indicates that the deployment was successful. Click "Access", now you can access iServer.
Here we take the WAS7 as an example to introduce the process of deploying SuperMap iServer on WebSphere Application Server.
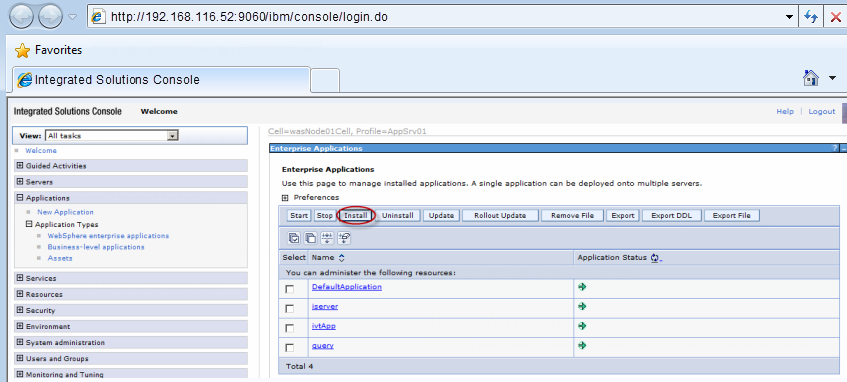
1. After the successful starting of WAS, enter http://<server>:<port>/ibm/console in the browser to login the administration console of WAS. On the Applications →Application Types → WebSphere enterprise applications tab, click "Install" to start the installation.

You can also select a service and and decide whether to start or stop it.
Note: For iserver#help.war and iserver#iClient.war, you first need to rename them to make the names include no special symbol "#". For example, change iserver#help.war to help.war.
2. In the following dialog box, users can select the war package to install from the local or remote file system. Click the Next button after the selection.

3. Select Fast Path or Detailed in the Preparing for the application Installation dialog box to install. Fast Path--Prompt only when additional information is required. Detailed - Show all installation options and parameters. Here we select Fast Path and click Next.
4. Keep default settings in the Select Installation options page and click Next.
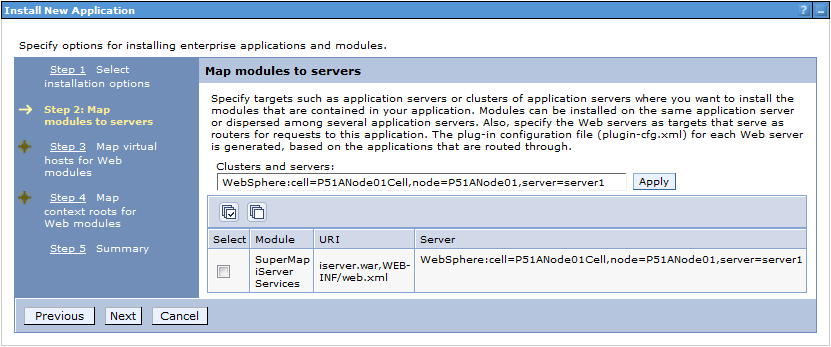
5. Map the module to the server in the Map modules to servers page, and the module can be installed on the same server or several servers, or on a Web server. If multiple servers can be selected, then the target server to be installed can be selected. If there is only one server, then no selection. By default, the installation will be performed on the current server. Click Next.

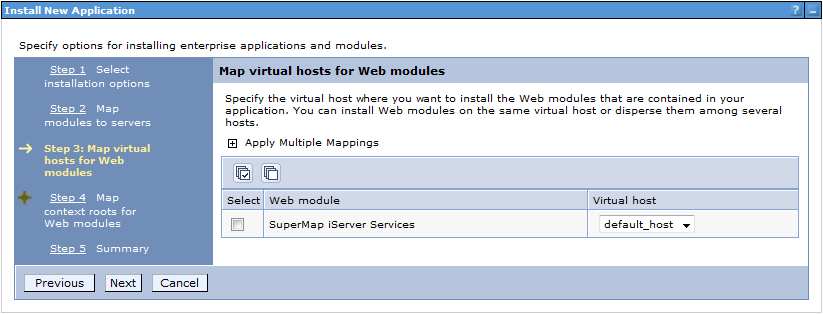
6. In the Map virtual hosts for Web modules pages, if there are many virtual hosts, select the one to be mapped, and if there is only one, then no selection, and the default is the current virtual host. Click Next.

7. Configure the context root path for the Web application in the Map context root for Web modules step, as shown below. The Context Root of the SuperMap iServer's core service is /iserver (if iserver.war is renamed, to renameiserver.war for instance, the Context Root should be /renameiserver):

The Context Root of Online Help is /iserver/help. The Context Root for iClient is /iserver/iClient.
8. Select Finish in the Summary page, and then click Save to save the configuration in the next page.

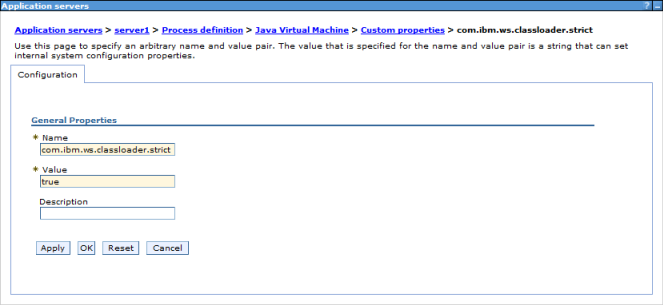
9. Configure the parameter com.ibm.ws.classloader.strict, and set its value to true. Click Servers→Server Types→WebSphere application servers→ "server_name", enter Java and process management → Process definition→ Java virtual machine → Custom properties, and then click the New button.

Note: This parameter needs to be configured in WebSphere 7.0.0.11. If the version used is 7.0.0.11, please upgrade to the expected version first.
10. After finishing the configuration, click Save.
Before deploying on Jetty, please check your environment by referring to Environment Configuration before Deploying war Package.
Jetty allows you to deploy either automatically or by the configuration file written. For the latter one, please refer to Jetty help documents. Below shows how to automatically deploy SuperMap iServer on Jetty 8.1.
1. Unzip SuperMap iServer war package to a directory. Place server.war to [Jetty Root Directory]\webapps; start Jetty and Jetty will publish iserver.war as Web service.
Into the Jetty root directory, open the command line window, enter the following command, you can start the Jetty service.
java -jar start.jar
Into the command line window, through the ctrl + c shortcut, you can turn off the Jetty service.
2. Make sure to change the names of the two files iserver#help.war and iserver#iClient.war and remove the "#" symbol before you deploy. E.g., change iserver#help to help.war and change iserver#iClient.war to iClient.war. Copy the two files help.war and iClient.war to [Jetty Root Directory]\webapps.
3. Start Jetty to publish help.war and iClient.war. The URI for help.war will be http://<server>:<port>/help, and the URI for iClient.war is: http://<server>:<port>/iClient. We want the URI for accessing help is: http://<server>:<port>/iserver/help and for iClient, it is: ttp://<server>:<port>/iserver/iClient.
4. We only need to do the following operation, take help as an example:
<Set name="contextPath">/iserver/help</Set>
<Set name="war"><SystemProperty name="jetty.home" default="."/>/webapps/help.war</Set>
<Set name="overrideDescriptor"><SystemProperty name="jetty.home" default="."/>/contexts/test.d/override-web.xml</Set>
Note: After deploying iserver.war via the web middleware management console, you need to restart the web middleware, otherwise it will cause iServer starting failed.